Submitting and tracking claims
The Claims surface is where the practice’s billing work lives — every claim moves through a small set of statuses, and each status has one or two actions that push it to the next stage.
How a claim is born
Section titled “How a claim is born”A claim is created automatically when a session note is Finalized. The system reads the session’s service code, units (duration ÷ 15 minutes, by default), the rendering provider, the place of service, the linked authorization, and the payer’s fee schedule, and it assembles a draft claim row.
That draft starts in Ready status — fully populated and waiting for a billing review. No claim is ever sent to the clearinghouse without an explicit submission action; the path from “session finalized” to “money in the bank” always passes through a billing user’s hands.
The claims queue
Section titled “The claims queue”Open Billing → Claims.
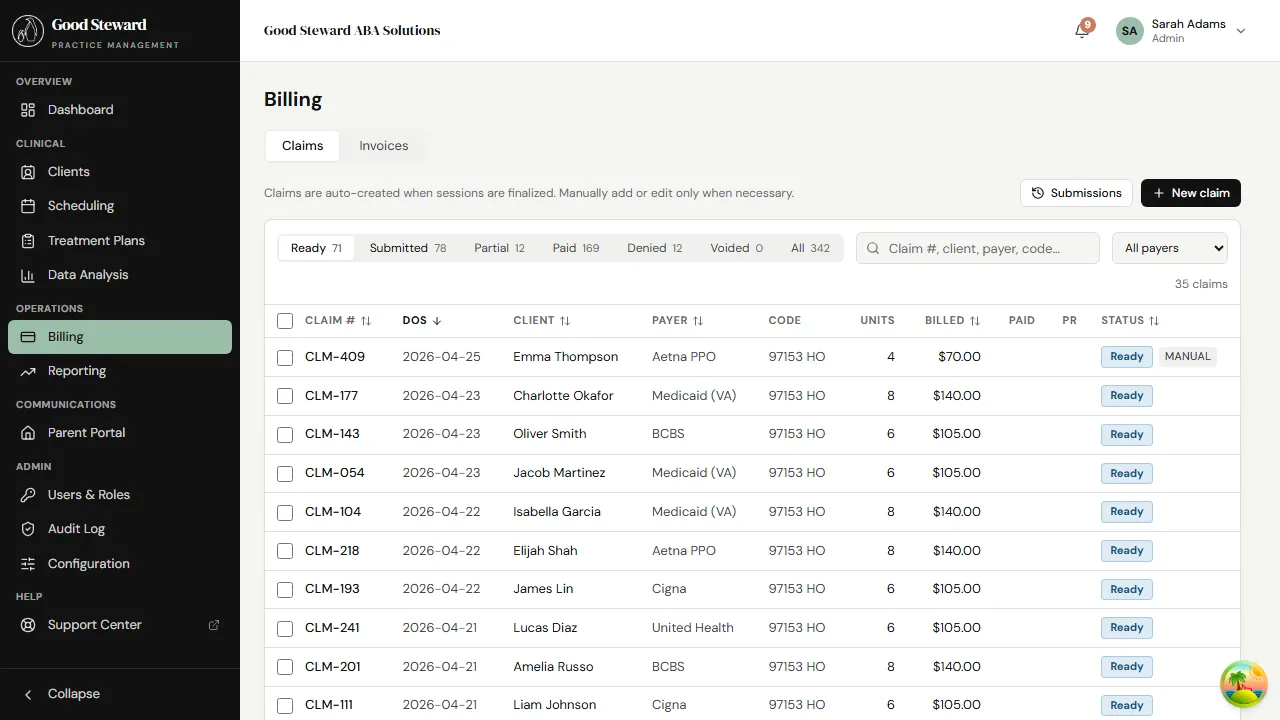
The queue has tabs across the top, one per status:
- Ready — fresh claims waiting to be batched and submitted.
- Submitted — sent to the clearinghouse, waiting for payer acknowledgment / payment.
- Paid — payment posted; this claim is done.
- Denied — payer rejected the claim. Needs review.
- Held — flagged manually; not eligible for submission until someone clears the hold.
- Voided — explicitly voided (duplicate, error, replaced by a corrected claim).
Each row shows the client, payer, service date, CPT code, units, billed amount, and quick actions. Click a row to open the claim detail.
Filtering the queue
Section titled “Filtering the queue”The toolbar above the table lets you filter by:
- Date range — service date window.
- Payer — single payer, useful before a submission run.
- Status — already implicit in the tab, but the Held and Denied tabs sometimes get long enough to want a date filter.
Claim detail
Section titled “Claim detail”Click a row to inspect a single claim.
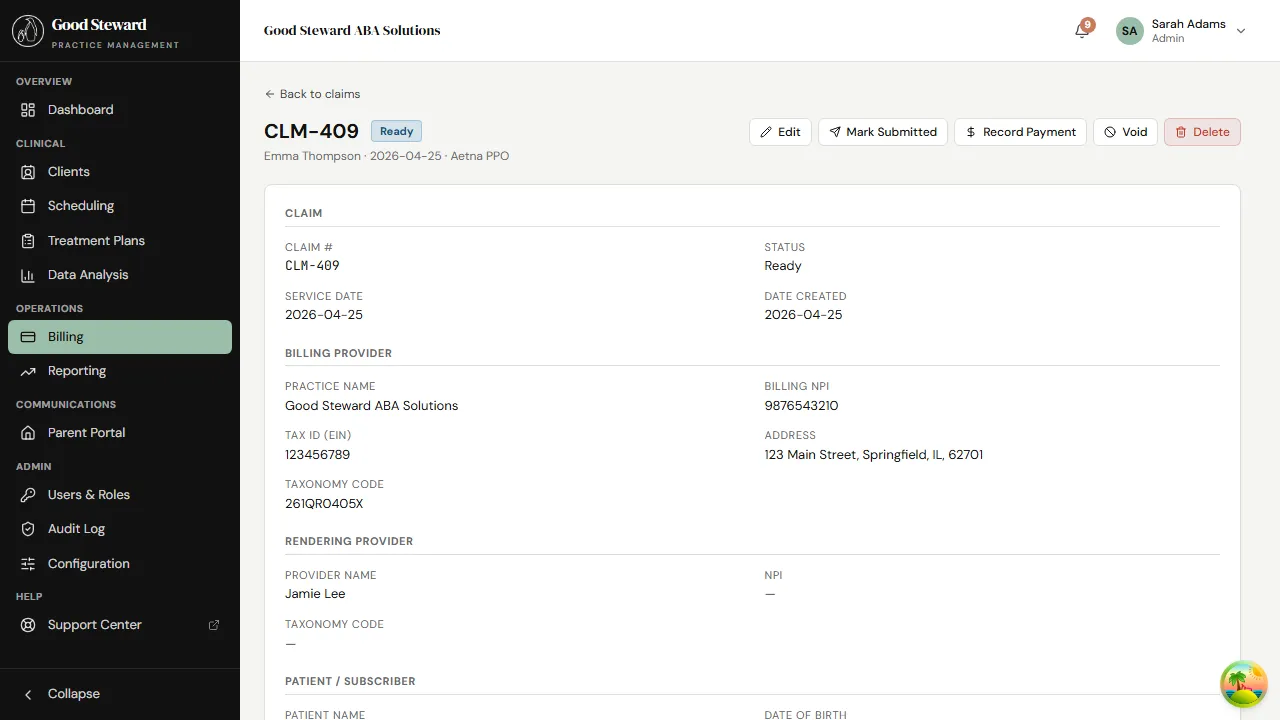
The detail page is organized into:
- Header — client, payer, status, billed amount, paid amount, outstanding.
- Line items — service code, modifier, units, rate, line total. Most claims have one line; multi-unit days can produce more.
- Linked session — the session this claim was generated from. Click through to read the note.
- Authorization — the auth row whose units this claim is drawing from. The remaining-units counter on the auth ticks down on submission.
- Billing summary — billed, allowed, adjustments, paid by payer, paid by patient, balance.
- History — every status transition with timestamp and actor. Append-only.
Editing a Ready claim
Section titled “Editing a Ready claim”Before submission you can correct line items, swap the rendering provider, change the place of service, or reassign to a different authorization. After submission these fields are read-only — the correct path for a post-submission fix is a corrected claim (see Submitting a corrected claim below).
Creating a submission
Section titled “Creating a submission”A submission is a batch of Ready claims sent together. Submission batches are how Office Ally and other clearinghouses prefer to receive 837P files — one file with many claims, one acknowledgment per file.
From Billing → Submissions, click New Submission.
- Pick a payer or “All EDI payers”.
- The dialog lists every Ready claim that matches; select the ones to include (default: all).
- Click Generate. The system builds the 837P file and shows it for preview.
- Submit sends it to Office Ally if automated submission is wired up (see Billing Configuration → Office Ally Submission); if not, click Download to get the .x12 file and upload to your clearinghouse manually.
Every claim in the batch flips to Submitted the moment the file goes out (or you mark the manual upload complete).
Recording a payment
Section titled “Recording a payment”When you receive an ERA / EOB:
- Open the claim from the Submitted tab.
- Click Record Payment.
- Enter the allowed amount, the paid amount, any adjustments (with CARC/RARC codes), and any patient responsibility.
- Save. If paid in full, status flips to Paid. If a balance remains and patient responsibility is owed, the system prompts you to either generate a secondary claim (if there’s a secondary payer on the client’s insurance tab) or invoice the parent for the balance.
For practices on Office Ally with ERA auto-posting enabled, this step happens automatically; you just review the auto-posted payments in the Paid tab.
Working a denial
Section titled “Working a denial”Open the Denied tab. Each row shows the denial reason code (CARC) and a short description.
The Reporting → Claim Denials report aggregates these across a date window — use it to spot patterns (e.g. a particular payer denying every 97155 because of a missing modifier, or a credentialing issue with one rendering provider).
For a single denial:
- Open the claim. The history log shows the denial reason.
- Determine the fix:
- Eligibility / coverage — re-run eligibility, update the client’s insurance tab, resubmit.
- Missing / wrong modifier — edit the line, submit a corrected claim.
- Authorization issue — verify the auth covers this date / code, contact the payer if needed, then submit a corrected claim.
- True denial (service genuinely not covered) — write off the balance, or generate a parent invoice if the practice’s financial policy passes the balance to the family.
- Click Resubmit (for first-pass fixes) or Submit corrected claim (which sends a new claim with the original claim’s ICN in the appropriate 837P loop).
Submitting a secondary claim
Section titled “Submitting a secondary claim”When a primary claim posts and a secondary payer exists on the client’s insurance tab, a Generate Secondary Claim button appears on the claim detail. Click it to create the secondary claim, which inherits the line items and references the primary claim’s allowed/paid/adjustment amounts in the right 837P loops.
The secondary claim is created as a Ready claim against the secondary payer; submit it the same way as any other claim.
Putting a claim on hold
Section titled “Putting a claim on hold”If you spot a problem before a claim has been submitted (e.g. wrong auth, payer ID needs verification), click Hold. The claim moves to the Held tab and is excluded from submission batches until you explicitly clear the hold. Holds always require a reason — the text shows on the claim detail and feeds the Claim Denials report’s Internal category.
Voiding a claim
Section titled “Voiding a claim”Use Void for a duplicate claim or a claim generated against the wrong client/payer. A voided claim cannot be submitted; if the void happens after submission, you need to follow it with a corrected / voiding claim to the payer (the clearinghouse will guide you on the exact 837P frequency code).
What’s automated vs. what needs a human
Section titled “What’s automated vs. what needs a human”The system handles, automatically:
- Creating the claim on session finalize
- Looking up the right rate from the fee schedule
- Decrementing the linked authorization’s remaining units
- Posting ERA payments (if Office Ally auto-posting is on)
The system won’t do without you:
- Submitting (you click submit on a batch)
- Working denials (you decide the fix)
- Generating secondary claims (one click, but the click is yours)
- Writing off uncollectible balances (deliberate decision per claim)
That split is intentional — claim generation is mechanical, but every outbound submission and every payment posting carries enough financial weight that the practice should sign off explicitly.